Scrap Buster: Conversation Coasters
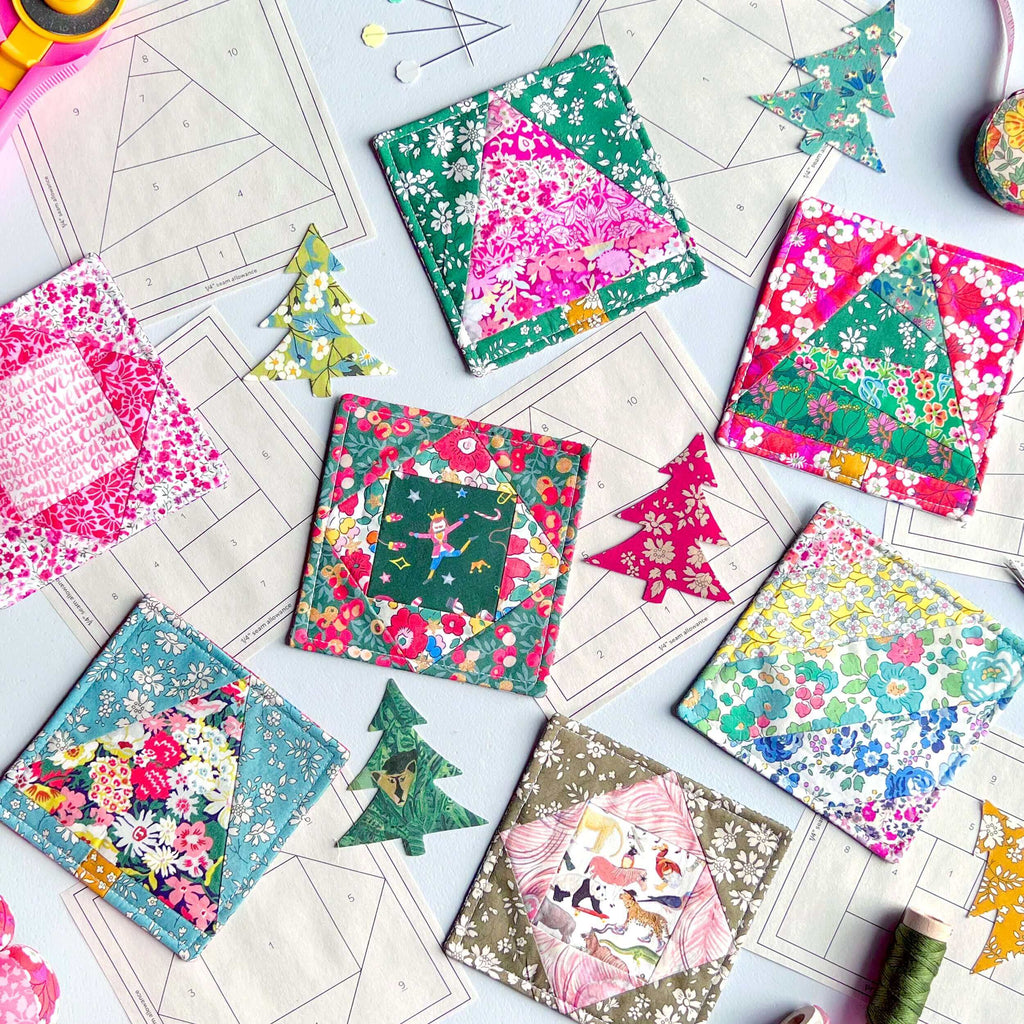
Dust off your bin of leftover fabric and rejoice in a Scrap Buster tutorial! This week we will teach you how to make a Conversation Coaster. They are sure to get your friends talking! Not only are they a breeze to make, but you can make A LOT of them with just a little fabric. Coasters are a great way to put your Liberty fabrics on full display and to get your creative juices flowing. So, get reacquainted with your fabric scraps or check out our thoughtfully curated stash packs and bundles for inspiration.
 Finished Dimensions
4.5" x 4.5"
Fabric Requirements
For each coaster you will need:
Front fabric (can be made with scraps): 5” x 5”
Back fabric: 5” x 5”
Fusible interfacing: 5” x 5” ** We like Pellon SF101 because the glue does not show through the fabric.
Fusible fleece: 4.5” x 4.5” ** We use Pellon 987F Fusible Fleece.
Sewing Supplies and Notions
Foundation Paper Piecing (FPP) paper
Point turner (optional)
Iron and ironing board
Cutting mat and rotary cutter
Ruler
Pins or Wonder Clips
Scissors
Sewing machine and good needle ** Schmetz Microtex 70/10 needles are our preferred sewing needles for Liberty Tana Lawn®.
ThreadStep by Step Instructions
Step 1: Create your Coaster Top!
Use our Conversation Coasters FPP Templates to create as many coaster tops as you want! Our FPP templates are 5" unfinished with the final coasters ending at 4.5" square.
Make sure to print out the Coaster Templates at 100%!

Step 2: Cutting Your Coaster Fabrics
In addition to your 5" x 5" Front block, you will need:
1 Back: 5” x 5”
1 Fusible interfacing: 5” x 5”
1 Fusible fleece: 4.5” x 4.5”

Step 3: Stabilizing Your Coaster
a) Carefully remove the paper template from your coaster front.
b) Iron the fusible interfacing to the wrong side of your coaster top, following the instructions provided by the manufacturer.
c) Center the fusible fleece on the interfacing leaving a 1/4" around the edges and iron according to the instructions provided by the manufacturer.

Step 4: Finishing Your Coaster
a) Pin or clip together the front and back pieces of your coaster (right sides facing).

b) Sew a 1/4” seam around the edge of the coaster, leaving a 2” opening on one side. It is easiest to sew the corners and leave the opening in the middle of a straight side.
c) Clip the corners to reduce bulk.

d) Carefully flip the coaster right side out. A point turner can help to create crisp, clean corners.

f) At the opening, fold the front and back fabric inside the coaster 1/4" and pin or clip to secure.

g) Top stitch around the entire perimeter of the coaster, as close to the edge as possible. We recommend a 1/8” seam or less to conceal the opening.

So many fun and festive options! Get creative and have fun!


